Step 1: Put everything ready
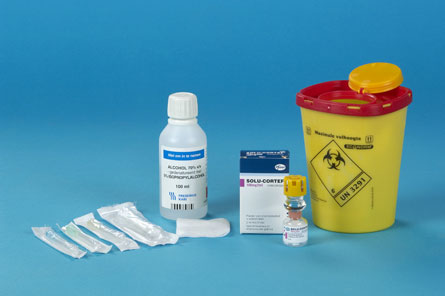 100 mg Solu-Cortef Act-O-Vial
- 2 ml syringe
- Drawing-up needle: 19G 1.1 x 50 mm (white)
- Injection needle: 23G 0.6x30mm (blue) or 21G 0.8x40mm (green)
- Alcohol 70% or a pre-packed alcohol wipe
- Gauze dressings
- Sticking plaster
- System for safe disposal of used needles, for example: sharps container or empty jar. Used needles can usually be disposed of at the municipal solid waste centre.
Step 2: Wash your hands
- Wash your hands with soap and water.
Step 3: Mix the 100 mg Solu-Cortef Act-O-Vial
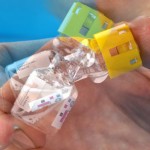
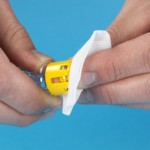
 Remove the two-chamber vial containing 100 mg Solu-Cortef Act-O-Vial from the packaging.
- Press the yellow cap down, so that the solvent can mix with the powder (100 mg hydrocortisone).
- Mix the contents gently, making a semi-circular movement with your wrist (do not shake) until the powder is completed dissolved. The powder (hydrocortisone) is completely dissolved once the solution is clear.
Step 4: Draw up the hydrocortisone
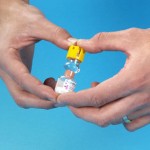
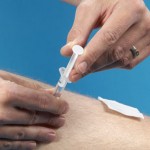
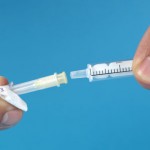 Tear the packaging of the 2ml syringe halfway down the back, and do the same for the packaging of the drawing-up needle. Place the drawing-up needle on the 2ml syringe, push the needle on and turn it slightly.
- Remove the protective disc from the centre of the yellow plastic cap of the vial.
 Use a gauze dressing dipped in alcohol 70% to clean the rubber stopper of the vial with a circular motion.
- Remove the cap from the needle.
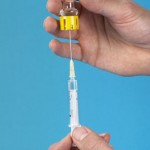
- Insert the needle into the vial. Turn the vial upside down. Ensure that the opening of the needle is at the ‘bottom’ of the vial.
- Draw up the liquid.
- Once all the liquid has been drawn up, turn the vial the right way up – with syringe and needle still inserted – before you remove the needle from the vial.
- Draw in a little air and put the cap back on the needle.
- Remove the injection needle from its packaging and replace the drawing-up needle with the injection needle.
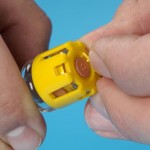
Step 5: Expel air from the syringe
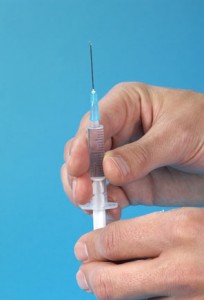 Check the syringe for air bubbles. If there are any air bubbles in the liquid, remove them by flicking gently against the syringe body, holding it upright with the needle pointing upwards. There needs to be a little air above the liquid, where the bubbles can go.
- Now gently expel all the air from the syringe by pushing on the plunger. Check the opening of the needle and stop pressing the plunger as soon as a drop of liquid appears.
- Put the protective cap back on the needle.
Step 6: Select the injection site
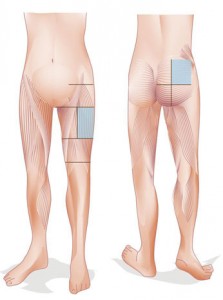 You can give an injection in the buttock or in the upper leg muscle. If you are injecting yourself, you can only do so in the upper leg.
- Select your injection site carefully, to avoid injecting into a blood vessel or nerve. You select the site as follows:
- Upper leg muscle: draw imaginary lines to divide the upper leg into three equal sections, choose the middle section and select a site on the outside of the leg.
- Buttock: draw imaginary lines to divide the buttock in half in both directions. Select a site in the upper outer quadrant.
Never inject:
- near the major blood vessels
- into scar tissue
- into areas that are inflamed or painful
- into paralyzed limbs
- into limbs with thrombosis or oedema
- into areas that have red or blue discolouration
- into an area that was recently operated on, or will soon be operated on
- into an area where radiotherapy has been applied
- into a bruise
- into areas that feel ‘hard’
- into an arm or a leg that has a drip or a shunt
- into an arm or a leg which has had lymphatic glands removed
- within 2 cm of the previous visible injection site
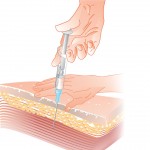
Step 7: Injecting

- Take hold of the prepared syringe with Solu-Cortef Act-O-Vial.
- The muscle at the chosen location needs to be relaxed.
- Spread the skin slightly between thumb and forefinger.
- Hold the syringe like a dart, and push the needle for 2/3 of its length into the chosen injection site at a right angle to the skin.
 Draw the plunger back slightly for 5 seconds, to ensure that you have not pricked into a blood vessel.
- If blood appears, stop and withdraw the needle; then repeat the above instructions at a different injection site.
- If you draw no blood and feel some resistance, depress the plunger slowly and inject the liquid.
- When you have finished, remove the needle in a quick, smooth movement.
- Cover the injection site with a gauze dressing. Do not massage the skin. A little blood may ooze out.
- If the injection site bleeds, cover it with a sticking plaster.
Phone your treating physician (endocrinologist)
After having (or giving) an injection with Solu-Cortef it is always necessary to get in touch with the treating physician or the internal medicine specialist or endocrinologist on duty. This also applies if your GP has given the Solu-Cortef injection. The specialist will determine whether the patient also needs to be examined at A&E and will make any necessary arrangements.
source: DIGD.07.041 IM injecteren van Solucortef_lr.pdf
with special thanks to:
Internal Medicine and Dermatology Division
Endocrinology clinic
UMC Utrecht, Heidelberglaan 100, P.O. Box 85500, 3508 GA Utrecht, The Netherlands
www.umcutrecht.nl
© 2013, UMC Utrecht, Internal & External Communications Dept.
Translation: thanks to Peggy van Schaik
Also in: Dutch

